DIY “Be-you-tiful” Heart Canvas

Hey everyone! Hope you all had an awesome weekend! Last week was the first full week I’ve worked in two weeks, so to say I was ecstatic when the weekend rolled around would be an understatement. I was able to accomplish so much and although I’d love to have a 2 week vacation re-do, I’m ready to get back in the full swing of things again.
One of the many things I was able to do over the weekend was create this adorable canvas. I don’t know about you all, but I love looking at all of the cute and girly inspirational canvases they have in stores these days.
Unfortunately, I’m not willing to pay $30 or more for something that I can easily create myself for a fraction of the price. I purchased some blank canvases awhile back to spruce up my bedroom walls, and I knew that I wanted to create something cute and girly, with an inspiring quote on it.
I chose to go with a classic look with black and white stripes, added in a bright pink and gold heart, and chose the phrase “Be-You-tiful”. I’ve always really liked the phrase, as it’s a reminder to be yourself and know that you are beautiful no matter what. I’m definitely one of those people who likes to hang the inspirational quotes on the walls around me, so I’m excited to hang this one above the mirror in my bedroom.
Let’s Get Started!
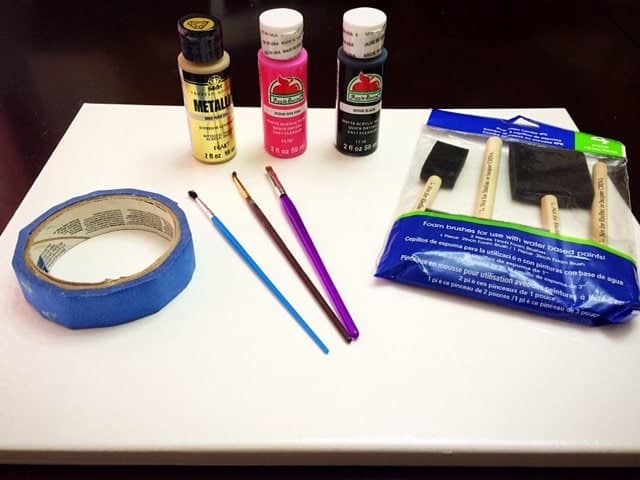
Supplies Used:
- 12″x 16″ Canvas ($1.59, Wal-mart)
- Foam Brushes ($0.97, Wal-mart)
- Paint Brushes ($0.97, Wal-mart)
- Painters Tape ($1.98, Wal-mart)
- Clear Tape ($0.97, Wal-mart)
- Acrylic Paint in Gold, Pink, and Black ($1.50 @ 50 cents each, Wal-mart)
Total Cost=$7.98
Step 1: Apply painters tape to canvas, ensuring lines are straight and evenly spaced.

Ensure the tape covers the sides as well, as you will also be painting this part.

Step 2: Using a small foam brush, begin painting the non-taped sections on the canvas black.

As the paint dries, re-apply the black paint as needed on white areas that show through.

Step 3: Once paint has dried, carefully remove painters tape. Any bleeding spots can be fixed at this point with a little white paint.

Step 4: Print and carefully cut out this Large Heart Template and this Small Heart Template template. Tape the edges of the cut-outs, as these will be your stencils for painting.

Step 5: Tape the large heart cut-out towards the center of the canvas using clear tape. Tape the corners and the edges around the heart.

Step 6: Using the “Pink Diva” acrylic paint and foam brush, begin painting in the large heart. While painting, firmly press down on the stencil to prevent bleeding.

Apply 5-6 coats to ensure none of the black striping shows through. Allow each coat to fully dry before applying the next coat, and if desired, use a blow dryer on the cool setting to quicken drying process.

Step 7: Once the pink heart has fully dried, tape the small heart stencil on the canvas in desired location. Carefully apply 2 coats of gold paint using small foam brush. Once dry, remove stencil.

Step 8: Using a small writing paint brush, carefully paint on “Be-you-tiful” with black. If you are not comfortable free-handing the lettering, you could also use stencils.

Finished Product

I really love the way it turned out, and I think the black and white looks great with the pop of pink and gold colors. This really is a simple project and you can easily switch up the colors and wording to create your own personalized canvas.
I hope you enjoyed today’s tutorial and I hope your Monday is off to a great start!
Thanks for stopping by and remember to stay be-you-tiful!- Cara
Linking up on Inspiration Monday, Inspire Me Monday, Creative Mondays, Totally Terrific Tuesday, Create, Link, Inspire, and Tutorials & Tips !

It looks so beautiful and easy to make. I like it 🙂
Thank-you! 🙂 Perfect for a weekend DIY!
This is adorable and in the colors i absolutely love! Definitely pinning 🙂 xo
Thanks Jess! Glad you like it 🙂
This is adorable! I love how it turned out. I’m with you–why spend money when it’s something you can make yourself 🙂 (If it’s easy enough, I’m game!)
Thank-you! Glad you liked it 🙂
i love a good diy project that i can actually make!! this turned out so well!
Thank-you! It’s very easy to make!
This is lovely, you did a great job here 🙂
Thanks for sharing at Creative Mondays, pinning 🙂
Thanks, Claire! 🙂
That is so cute!! Would love to make one of those for Harpers room!! She’s going to need a new big girl room soon so will need some new decor!
Thank-you! It was super simple to make and canvases look great in kids rooms! 🙂
So, so cute and crafty! I love canvases and some can be so expensive! Good job!
xo, Lily
Thank-you! They really can be pricey, and it is very inexpensive to do your own.
it’s unreal how easy it is to make your own canvas for just a couple of dollars.
i wanted a canvas for my craft room that said “but first, coffee” and every canvas i saw online or in store was over $50. HELL TO THE NO.
instead, i did it myself and it only cost me $3 – $2 for the large canvas and $1 for the set of foam brushes. i already had painters tape and jacked my daughter’s glitter paint LOL.
Exactly! It’s crazy to pay so much when it literally takes just a couple of hours and a little bit of creativity/craftiness to make your own.
This is so cute! You’re so crafty!
Coming Up Roses
Thank-you so much!
Such a cute DIY! I’ll be moving into a dorm room soon so this is perfect.
Thank-you! Something like this would definitely look cute in a dorm room! 🙂
That came out really cute. I totally agree much more affordable to do it yourself and it comes out how you want it.
Exactly! In general, I just like hand-made items over store bought. & Thank-you!
Ahhh, I love it! How creative and love the positive messaging!! You always have the cutest ideas 🙂
Thank-you! 🙂 It was super easy to make!
So cute!!! Love the design!!!
Thanks Stephanie! 🙂
Such a pretty canvas, you did an amazing job gurlie <3
Green Fashionista
Thank-you! 🙂
This is so pretty! It looks like it came from a store!
Aw, thank-you!
This turned out great! I love the little golden heart detail 🙂
xoxo
Novelstyle
Thank-you! I think it looks nice with the black and white.
This turned out sooooo cute!!! I love it!!!!
Thank-you! It definitely spruced up my bedroom. 🙂
So easy to create! I need to get on making some art 🙂
xo, Jessica || The Petite Diaries
Thanks, it really was super easy!
Very cute! I did something similar last year (or maybe it was the year before). I did black and white stripes and I used red buttons for the heart. It’s cute, but wow was it a pain to glue on all the buttons, haha. I love yours! Adding the smaller metallic heart was a nice touch!
Oh that sounds so cute! I’ve always wondered if the crafts with buttons were tedious-haha & thank-you!
Great tutorial. I can make this. Thanks
Thank-you! Hope you enjoy making it! 🙂
Very cute! Love the colors you chose
Thanks Alison!
What an adorable canvas!
Kari
http://www.sweetteasweetie.com
Thank-you! 🙂
Oh I love this!! I saw something similar at Hobby Lobby and was like psh I can make that.. but of course haven’t done it yet =) This reminds me! I love how yours came out
Thank-you! Haha I do that with decor too! Hope you’ll give it a try 🙂
Great Job!
Thanks!
Oh my goodness!!! I LOVE THIS!! What a cute idea and one I could do with my girls too! Thanks for sharing this!
Xo,
Carole
Thank-you! My two boys actually helped paint the pink heart, so definitely a fun project for all ages!
So stinkin’ cute!
I love the colors!!!
Thank-you! 🙂
That’s adorable. And that’s actually how my mom pronounces it. LOL
Thank-you! Haha, that’s too cute!
This is so pretty! Mine wouldn’t look this cute, but I love it!
Thank-you! It was so easy, really. 🙂
This is such a cute DIY! I love the pops of pink and gold against the black and white!
Thank-you! I do too, it really brightens up the classic black and white look.
I love cute canvas art and this is adorable!!! Great job “beautiful!”
Thank-you! 🙂