Gorgeous Chalk Paint Dining Table Makeover (DIY)
Want to learn how to use chalk paint to update an old dining room table to a beautiful, modern farmhouse table? Check out my Chalk Paint Dining Table Makeover DIY Tutorial using Rustoleum Chalk Paint!

*This post contains affiliate links
Chalk Paint Dining Table Makeover Tutorial
Hey everyone! For today’s post I’m excited to (finally) share our Rustoleum Chalk Paint Dining Table Makeover and Chalk Paint Table Tutorial.
This is a fun DIY project I completed last Fall season, and I wanted to put together a full post with tips on how to use my favorite Rustoleum Chalk Paint.
This is hands-down THE BEST chalk paint I’ve ever used, and I’ve used it to makeover several furniture items in my home, and for creating DIY farmhouse crafts.
It’s very easy to use, affordable, and you can even get it shipped to you fast from Amazon!
This chalk paint dining table makeover ended up being one of the best DIY projects I’ve ever done, and I’m SO happy with how it turned out.
That’s why for today’s post I’m sharing all the details on my DIY chalk paint table experience in the hopes that it will help others who want to give their dining table a chalk paint makeover.
If you want to learn how I did this modern farmhouse chalk paint table makeover then keep reading and be sure and leave me any questions you have about chalk paint in the comments below!
More Home Projects:
- Small Pantry Makeover + Organization Ideas
- Tips for Decorating a Home Office on a Budget
- DIY Farmhouse Stacked Hand Stamped Books
Modern Farmhouse Dining Table Makeover
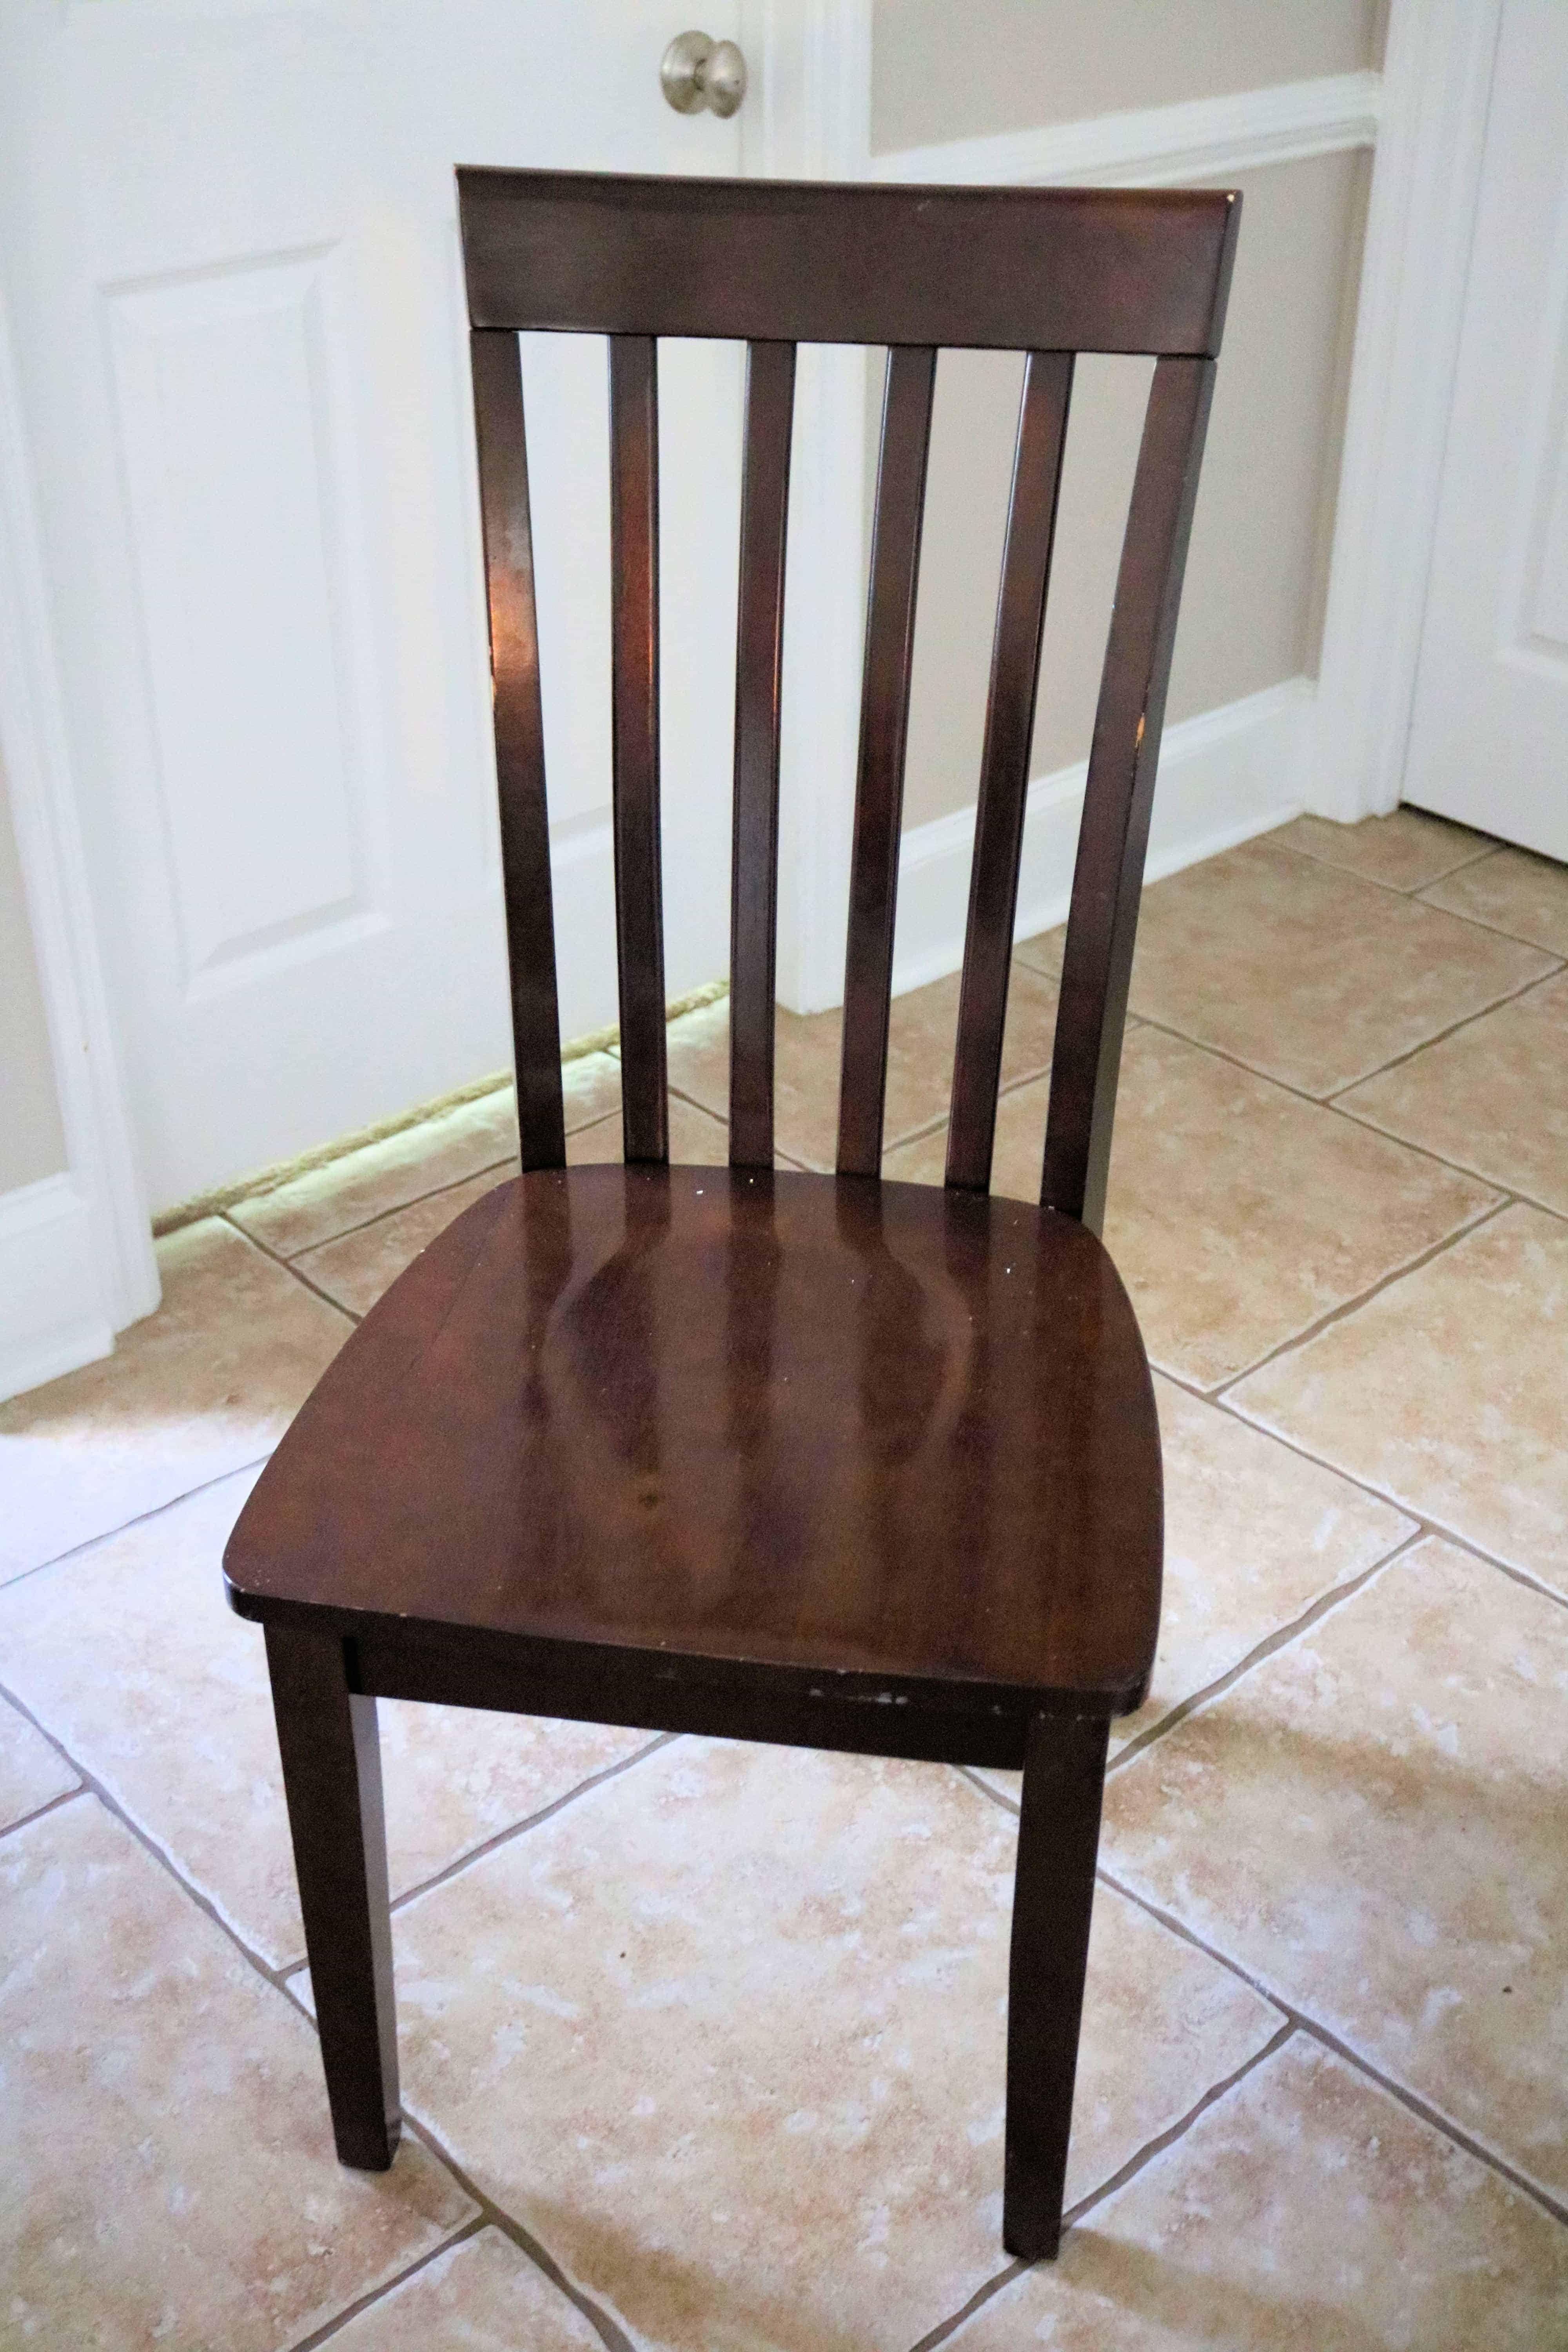
Our dining room table has been part of our family for over 9 years now and while I’ve always loved the size of it, it was looking pretty rough after surviving 5 moves.
Both the table and chairs were nicked and scratched, and there were a couple unfortunate burn marks on the top of the table that always bothered me.
Plus, the stain was a bit dark for my current taste and I was ready for a change.
Although I could have easily went and bought another dining set, I guess I’ve grown somewhat sentimental of this one with our boys literally growing up with it.
Plus, I had always really wanted to do a chalk paint makeover and I knew this was my chance!
I’ve always loved the look of modern farmhouse dining room tables so I used that as my inspiration.
With the overall goal to really brighten up our dining room space, I decided to chalk paint the legs of the table and the backs and legs of the chairs with chalk paint and to sand and stain the table top and chair tops with wood stain.
The two products I used (and absolutely LOVE) are Rustoleum Chalk Paint in the shade “Linen White” and Rustoleum Fast Dry Wood Stain in the shade “Kona”.
-
Buy Now$24.57
If you make a purchase, I will make a commission at no extra cost to you. Thank you for your support!
05/14/2026 05:00 am GMT -
 Buy Now$14.87
If you make a purchase, I will make a commission at no extra cost to you. Thank you for your support!
05/14/2026 01:00 am GMT
I’ve received several comments/questions regarding what supplies to use for your chalk paint dining table project, so below I’ve rounded up everything I used and would recommend!
Recommended Chalk Paint Table Supplies:
- Chalk Paint: Rustoleum Chalk Paint Linen White or 2 Pack (if doing several chairs/large table)
- Stain: Rustoleum Fast Dry Wood Stain in Kona (Amazon) or Rustoleum 2-in-1 Wood Stain in Kona (Walmart)
- Clear Coat: Minwax Polycrylic Protective Coat or Ultra Matte Clear Chalk Paint Protective Coat
- Foam Roller: Roller Set
- Paint Brushes: Pro Grade Paint Brushes and Angled Brush
- Detail Brushes: Small Paint Brush Set (for detailing)
- For Protection: Drop Cloths
- Sanding: Electric Sander and Sanding Paper, Various Grits
- Finishing: Block Hand Sander
- Clean-Up: Microfiber Cloths and Lysol Cleaning Wipes
Modern Farmhouse Dining Table Makeover Before Photo
Below is a photo of what the dining room table looked like before the chalk paint dining table makeover.

Chalk Paint Q&A – What to Know About Chalk Paint
Before diving into the actual tutorial, I wanted to quickly answer some of the most commonly asked questions about chalk paint and some of my best tips for using the Rustoleum chalk paint to give your dining room table a makeover.
What Is So Great About Chalk Paint?
With chalk paint there’s zero prep involved and the full coverage requires less coats than traditional paint.
This equates to a much easier and quicker project than a traditional paint job.
You can also use chalk paint on almost any surface and it adheres well to laminate, particle board, solid wood, leather, and more.
Why I Chose Chalk Paint
I wanted something that would give my dining table a fresh new look and I knew that chalk paint would really brighten things up.
I’d also heard people rave about how easy it was to use for years and wanted to try it out on some projects around the home.
I first used it to paint my vanity as a test run and was instantly hooked after seeing first-hand how easy it was to work with and how beautiful it made my vanity looked.
What is the Best Chalk Paint?
I personally LOVE and 110% recommend Rustoleum Chalk Paint.
I talk a little bit more in detail below about why I recommend this paint over other popular brands, but mainly I love it because it’s affordable, easy to use, and amazing quality!
Do I Need to Sand Wood Before Painting with Chalk Paint?
Nope! That’s why chalk paint is so fabulous.
You don’t have to sand wood down before painting like you would with regular paints.
It glides right on and has amazing, full coverage.
***Disclaimer –
After receiving numerous questions/comments regarding this, I thought I would clarify:
If you plan to re-stain the tabletop like I did, you will need to sand the tabletop to remove the previous stain.
However, this is ONLY if you are re-staining.
You DO NOT need to sand if you are only chalk painting your furniture/table.
Can You Really Chalk Paint a Dining Table & Will It Last?
I too was a little skeptical at first with the idea of chalk painting our dining table, but it turned out amazing and I’m so pleased with the results.
Even now, over a year later, it’s still held up wonderfully and looks like I painted it yesterday.
I definitely recommend applying this clear protective top coat over the chalk paint to ensure it lasts a long time.
I applied a total of 2 coats.

Alternatively, I’ve also used this matte clear protective top coat on other furniture items I’ve re-finished, and it’s great!
I’d recommend either of these top coats, it really just depends on whether or not you want a matte or satin finish.

How Long Does It Take to Chalk Paint a Dining Table?
Without interruptions, you can easily chalk paint a dining table over the course of 3-4 days, or 1 week at most.
It ended up taking me quite a bit longer because I was constantly having to stop and start.
I mostly worked on it during the evening hours whenever I had time and it took me about 3 weeks.
If I were to do it again, I would recommend taking time off so you can tackle it all in one go.

How to Use Rustoleum Chalk Paint for a Dining Table Makeover
First things first, you’ll want to grab all the needed supplies for this project.
I’ve included all my recommendations below and the products I used for this chalk paint table makeover.
Recommended Chalk Paint Table Supplies:
- Chalk Paint: Rustoleum Chalk Paint Linen White or 2 Pack (if doing several chairs/large table)
- Stain: Rustoleum Fast Dry Wood Stain in Kona (Amazon) or Rustoleum 2-in-1 Wood Stain in Kona (Walmart)
- Clear Coat: Minwax Polycrylic Protective Coat or Ultra Matte Clear Chalk Paint Protective Coat
- Foam Roller: Roller Set
- Paint Brushes: Pro Grade Paint Brushes and Angled Brush
- Detail Brushes: Small Paint Brush Set (for detailing)
- For Protection: Drop Cloths
- Sanding: Electric Sander and Sanding Paper, Various Grits
- Finishing: Block Hand Sander
- Clean-Up: Microfiber Cloths and Lysol Cleaning Wipes
Before diving into a chalk paint project, you’ll need to first decide on the kind of chalk paint and color you’ll want to use for your project.
I ended up choosing and 110% recommend Rustoleum Chalk Paint in Linen White. It’s such a beautiful, bright, white paint and looks so clean and fresh.
Other popular colors include Rustoleum Chalk Paint in Charcoal Gray and Rustoleum Chalk Paint in Serenity Blue. Both of these colors would look beautiful paired with white.
I personally did a lot of research on chalk paints and while the Annie Sloan chalk paint was highly rated, the Rustoleum Chalk Paint was the preferred choice by so many users who stated the formula was easier to work with.
It’s also a lot cheaper than Annie Sloan Chalk Paint, so for me it was a no-brainer.

Next, I cleaned all the furniture really well using a rag and good ol’ soapy water to get rid of any food, dirt, or grime on them.
Don’t skip this step unless you want PB&J eternally encrusted on your chairs (haha).
After that it was time to sand the seat tops and table top.
PLEASE READ:
***Since I’ve received so many questions on this, I want to clarify –
You ONLY have to sand if you are going to be staining parts of your table like I did.
You DO NOT have to sand for the areas you are chalk painting.
I used this electric sander in my garage and it made the job a total breeze.
I was able to get all 6 chairs sanded smooth in less than an hour. I also went over top of it with this hand sander with a fine grit to make it super smooth and soft.
The table top took a little longer than the chairs, but again the electric sander made the process so much quicker than if you were attempting to sand manually.
I’m pretty sure you would go crazy doing that, so do yourself a favor and grab this affordable sander.


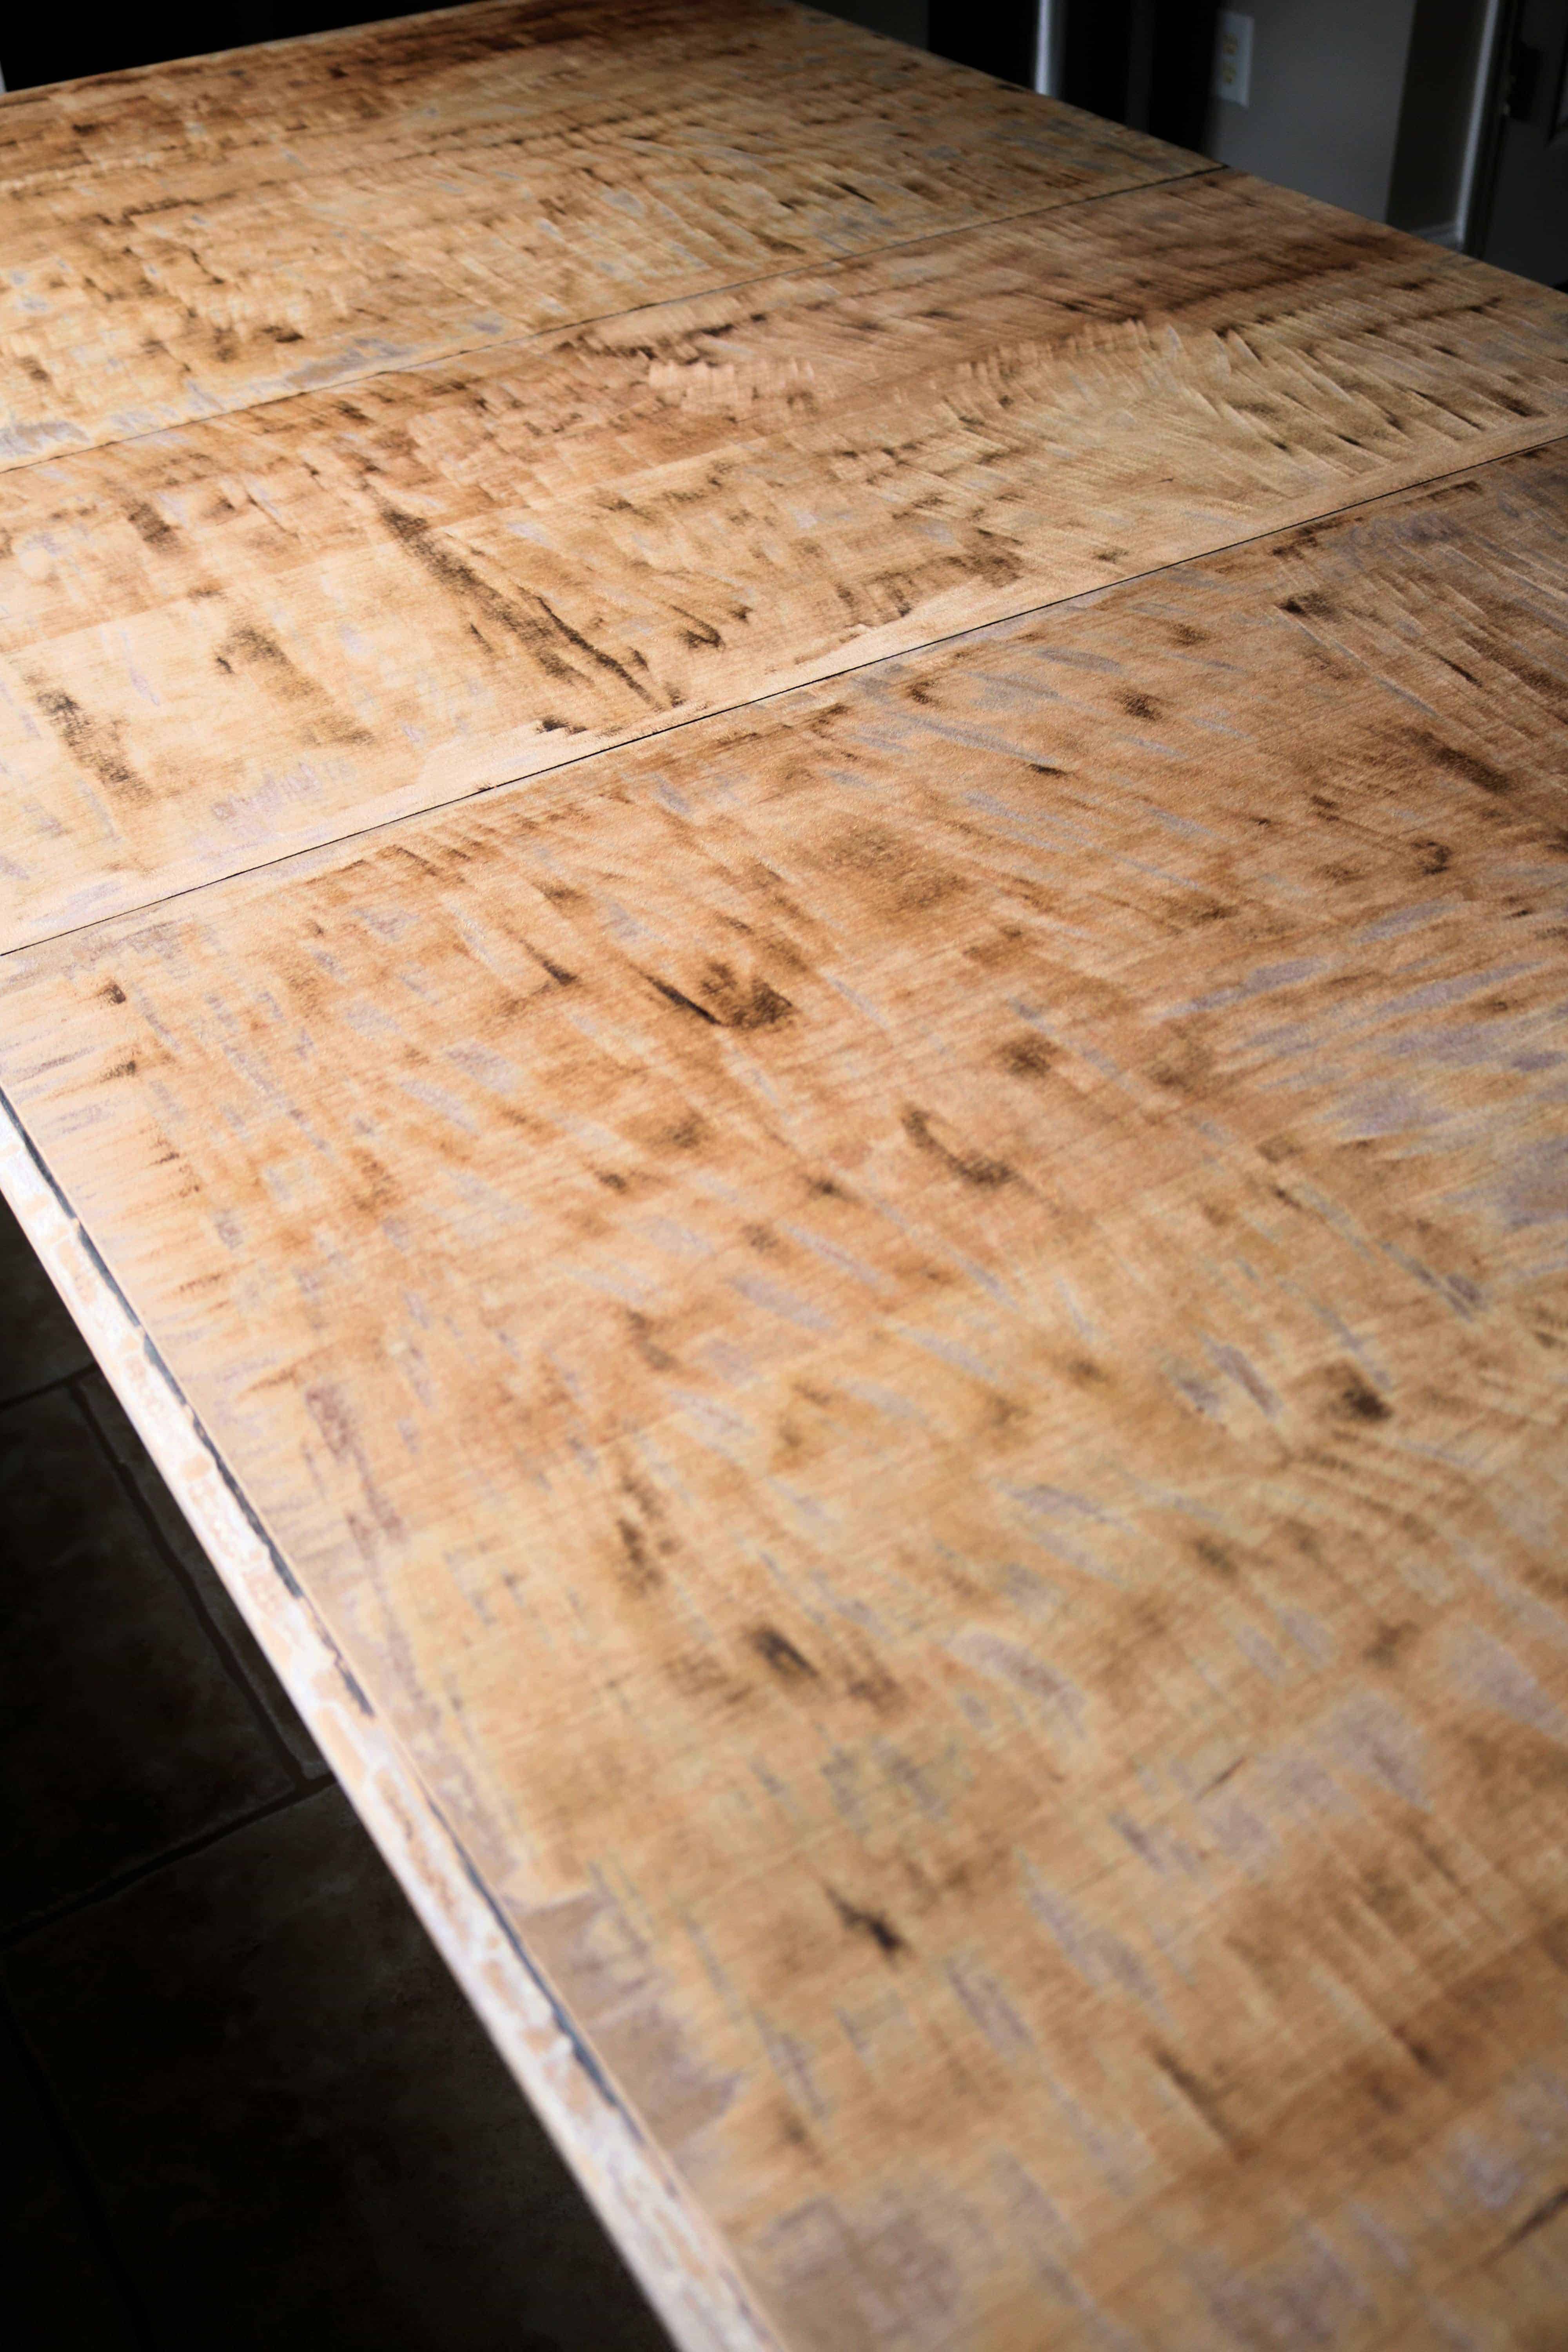
Next was the fun part of staining the table top and chairs.
I used the Rustoleum 2-in-1 Stain in Kona which has both the stain and polyurethane in one.
I definitely recommend getting the 2-in-1 formula, as this helps eliminate extra steps for you.
If you don’t like this particular stain, I’ve also purchased/used these fast dry wood stains, and they come in a TON of different pretty shades.
I did a total of 3 coats, lightly sanding with a fine grit sander sponge in between each coat.
I also used my vacuum’s furniture duster to get rid of any dust or debris on the surface and these awesome microfiber cloths.
Once the staining was completed I used the chalk paint to paint both the legs and backs of the chairs and table legs. This was the most time consuming step in the entire process because it took about 3 coats total to get the desired level of coverage I was looking for.
The trickiest part by far was doing the back area of the chairs where the seats and backing meet.
I actually used some small craft paintbrushes for this part as it was easier to get into all the tiny crevices that way, and used these lysol wipes for any paint on stain mishaps along the way.
Because I did it immediately any stains wiped off easily.
Last but not least I applied two coats of this clear top coat to both the table and chairs to protect it.
DON’T SKIP THIS STEP – especially if you have kids. Using this clear coat will help protect your painted table for many years to come.
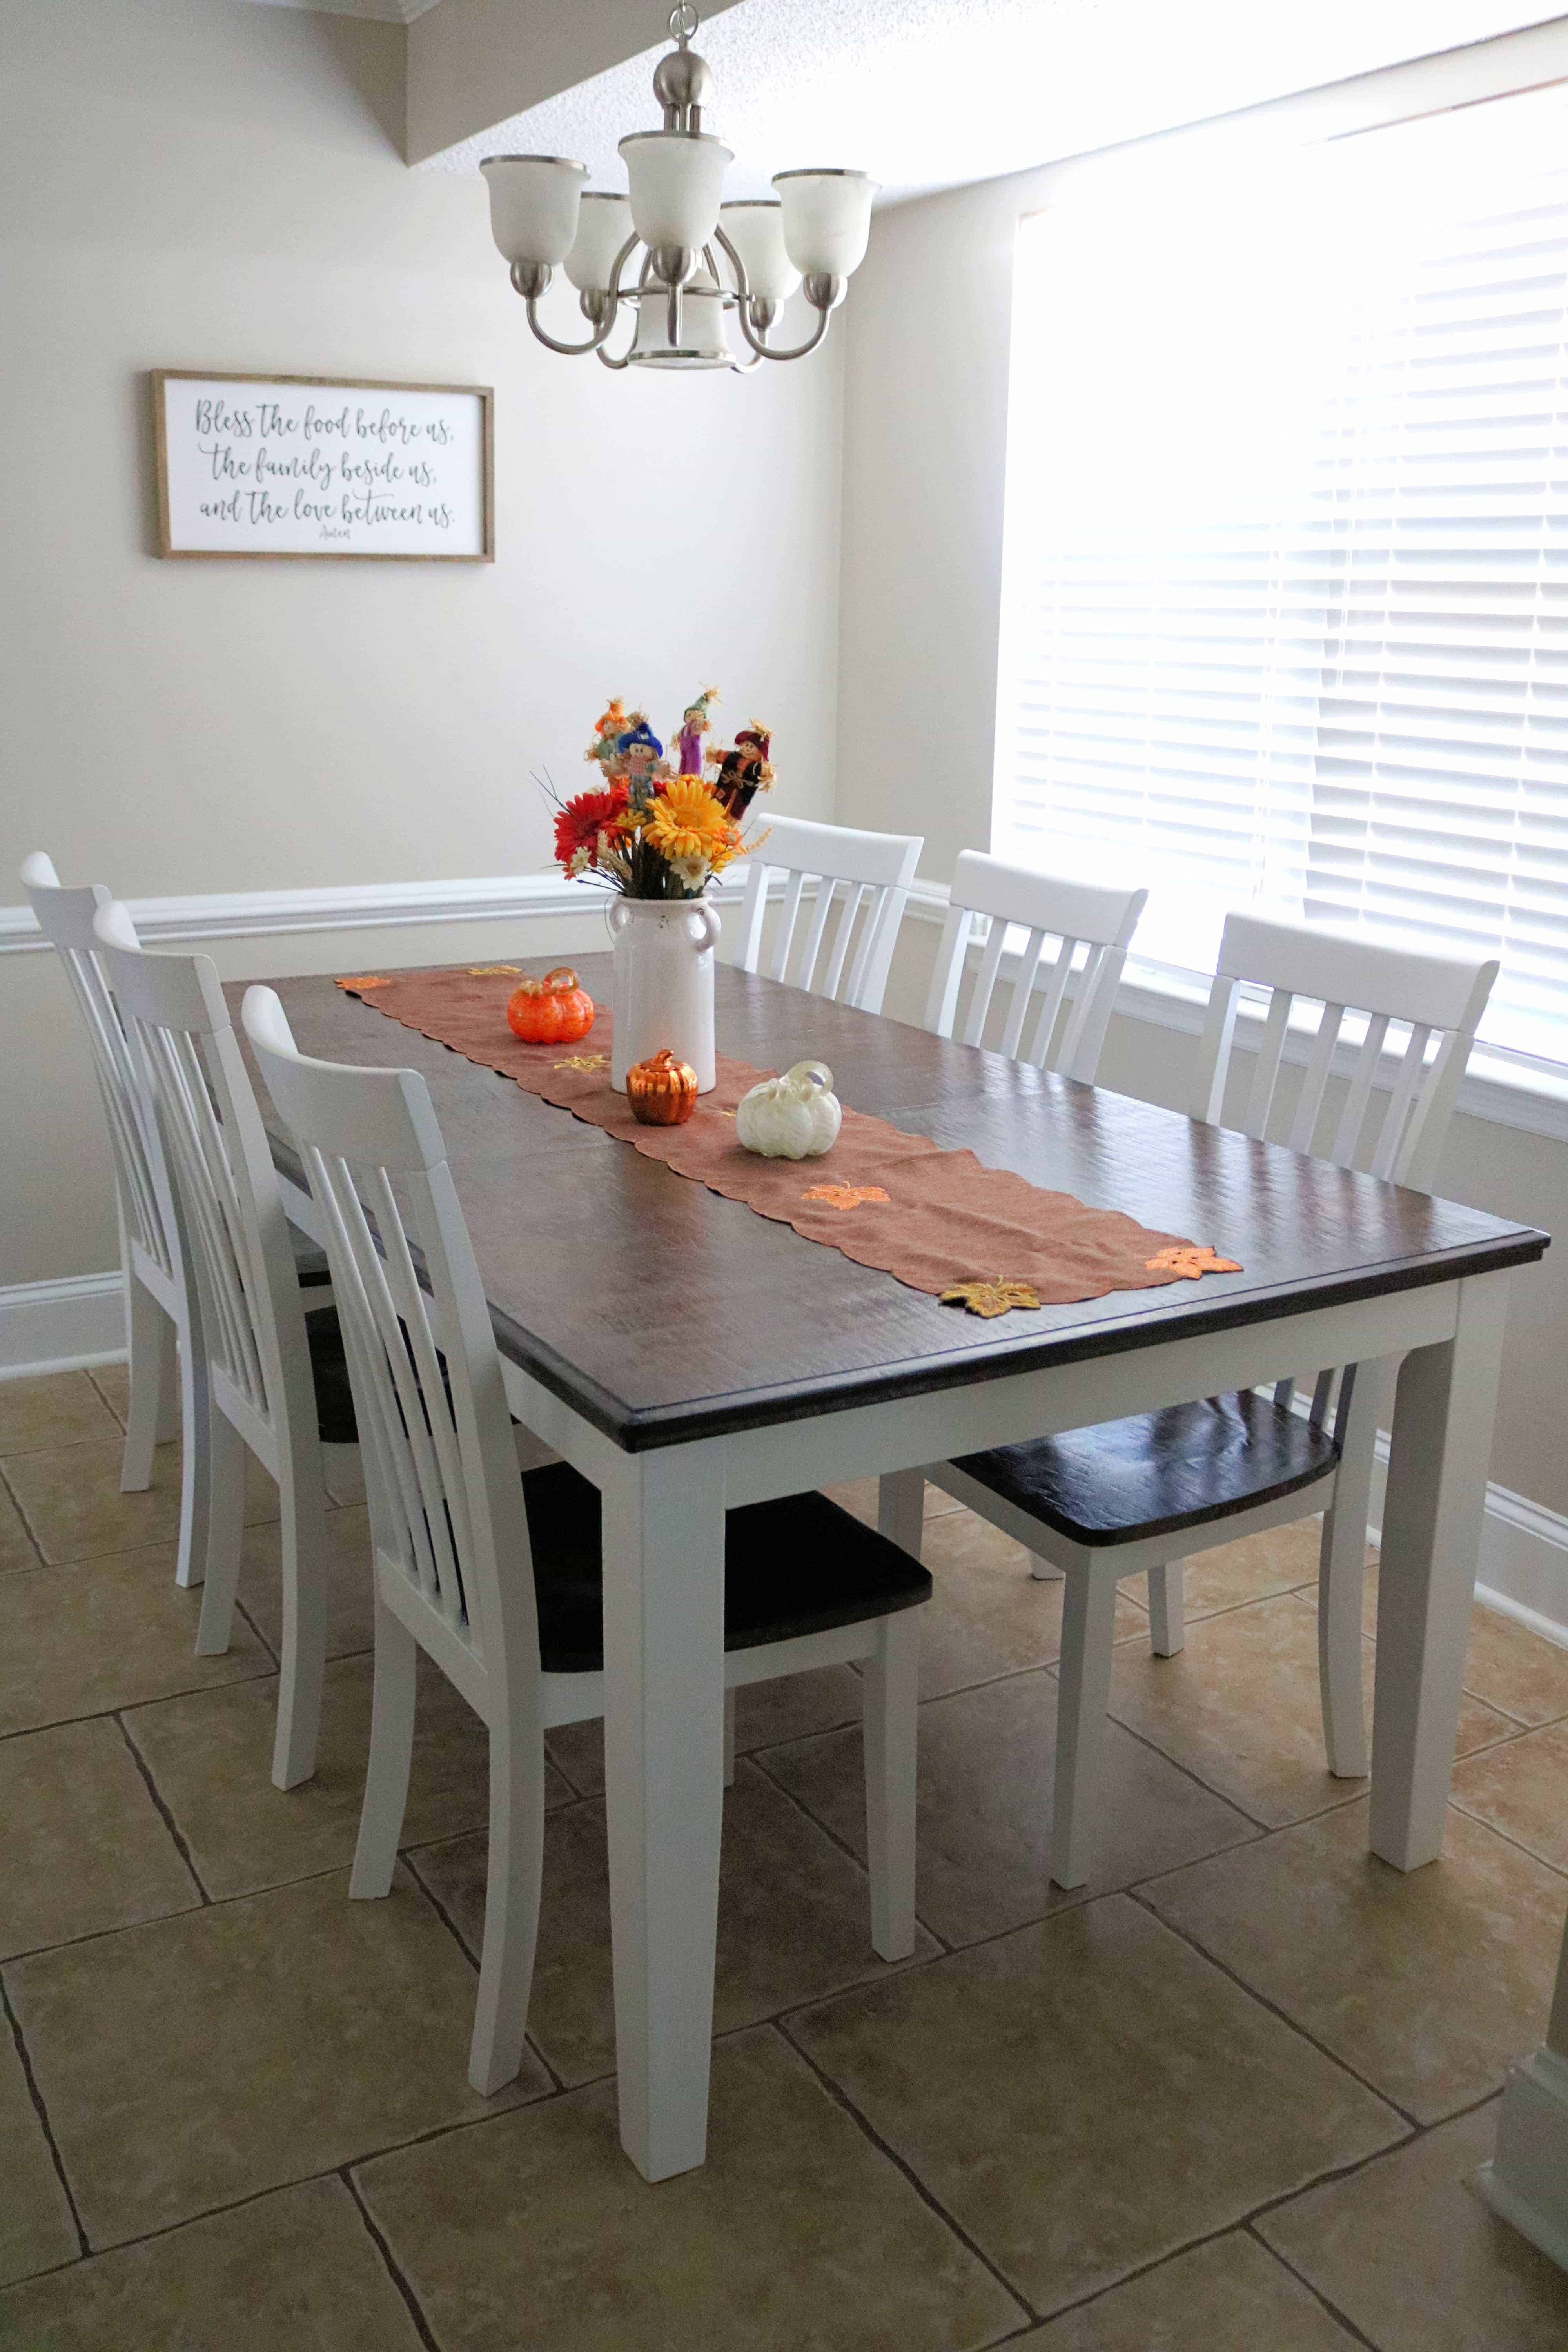
Chalk Paint Table Makeover – Before & After
And without further adieu here’s some lovely before and afters of this chalk paint dining table makeover.
I’m kind of (okay, A LOT) obsessed with how it turned out and I seriously can’t get over the dramatic difference in the before and after.
It seriously brightens up the space so much and gives my dining room that modern farmhouse look I was going for!
Before Chalk Paint Dining Table Makeover

After Chalk Paint Dining Table Makeover


Ready to makeover your dining room table? Grab the recommended supplies you’ll need below!
- Chalk Paint: Rustoleum Chalk Paint Linen White or 2 Pack (if doing several chairs/large table)
- Stain: Rustoleum Fast Dry Wood Stain in Kona (Amazon) or Rustoleum 2-in-1 Wood Stain in Kona (Walmart)
- Clear Coat: Minwax Polycrylic Protective Coat or Ultra Matte Clear Chalk Paint Protective Coat
- Foam Roller: Roller Set
- Paint Brushes: Pro Grade Paint Brushes and Angled Brush
- Detail Brushes: Small Paint Brush Set (for detailing)
- For Protection: Drop Cloths
- Sanding: Electric Sander and Sanding Paper, Various Grits
- Finishing: Block Hand Sander
- Clean-Up: Microfiber Cloths and Lysol Cleaning Wipes
What do you think of this Chalk Paint Dining Room Table Makeover? Have you ever used chalk paint for any DIY projects in your home? Let me know in the comments and be sure and drop any questions you have about this chalk paint table makeover below!
Thanks for stopping by! – Cara
Pin This Post For Later


you did a great job in both the directions and the table and chairs. Thank you for posting the before and after pictures. Now if I could only convince my husband to let me do this to the antique oak table we have had forever.
You’re welcome! I’ve did this process on several other pieces of furniture and it works great. Good luck with your project!
Hello! I was wondering if you have any opinions on a wipe-on poly to avoid brush strokes? Minwax has both a oil-based and water-based version of this. Also is there any concern about food touching the table with the finish on it (is it “food safe” I guess). Thank you!
https://www.minwax.com/en/search?q=wipe+on
Hi! I have actually used the wipe-on poly on other projects and actually used it on a smaller table I refinished last year. It turned out great, it just really comes down to personal preference on which one you want to use. And I’ve never had any issues with food touching the table – hope that helps!
What do you do if I want to chalk paint the top and leave the legs the original color?
You don’t have to sand the top, simply paint over the original top with however many coats it takes to get complete coverage (typically 2-3 coats). I would then recommend you let it dry a full day before adding a clear top coat. Let dry again, then add another clear coat for extra protection.
Hi Cara. I love love love your makeover. I plan to purchase a used set to makeover. I am wondering 1st if it would be easier/more cost effective, to sand it all and use less coats of paint on the chairs and legs, and 2nd; I wonder if using a 2 step stain would prevent from having to sand between each stain coat? Your dining set looks amazing!
Thanks, Melissa! You could certainly sand everything and you probably wouldn’t have to use as much chalk paint if you do that. In regards to the sanding between stain coats – that’s mostly just to get as smooth of a finish as possible. I hope your project turns out amazing!
Where is the table from?
It’s Ashley home furniture brand and we bought it at the Navy Exchange over a decade ago.
Wow, I love it!! Such a great look! I’ve been debating on what to do with mine since I’ve redone everything in my house in shades of gray and white and dinning room set is oak colored and it looks out of place. I’m definitely going to try this but think I’ll paint table top gray. Thanks for the great tutorial!! Can’t wait to get started!
Thanks, Debbi! I hope your table turns out beautiful!
I am reading all these post because I am seriously considering a chalk paint finish for a varnished dining table and chairs. The chairs are wood with fabric covered cushions and the table is wood except for the top which is a paper veneer. So there is no sanding for the table top. I chalk painted A bathroom vanity a couple of years ago only did a light scuff sanding and put on two coats and coat of clear poly. This turned out amazingly well and is holding up amazingly well. I chalk painted a small table black with some gold detail and transfers and protected with poly – looking good. Did a coffee table for my daughter who wanted navy for the bottom and gray stain on top. Carefully sanded the top veneer and used poly with chalk paint for the stain two coats then gave everything two more coats of poly. Holding up well.
Bottom line, I am going to give the chairs and table a coat of water based primer as they are a reddish stain. Will then paint a cream color chalk paint at least 2 coats on the chairs and table base. A paper veneer table top looks pretty awful and I am probably going to try to get some kind of textured finish here and do it in a brown for some contrast. Then plenty of poly for protection. Will bring out the chair details with some dark wax too.
If you are sanding then you need to know WHAT you are sanding — solid wood or veneer. You have to be so careful not to sand through the veneer. And not all wood furniture is made from good wood and therefore it will not all take the stain and protective finish well or consistently— just know this. You may get by with a scuff sanding followed with a coat of stain-finish (2 in 1) to freshen up the look if you are not changing the color much or going darker.
Still learning— not an expert but I have learned from some mistakes. Hope this helps anyone who wants to try painting furniture.
After thinking about it, I went back with an artist’s brush and covered all the bleed throughs with primer. The color was enough of a match. I put another coat of poly on the seats and backs of the chairs. Called it a day. Lesson learned: always use a primer first no matter what anyone says. Results are very satisfying.
Glad your project turned out well!
Thanks for sharing these helpful tips, Jeanette!
Ok. So I painted the kitchen set with the chalk paint and distressed it. Great coverage! Looking very good. Then I put on the Mnwax poly and something brown started bleeding through in some places.I did clean it very well before starting the project. So disappointing. I think what I am going to do at this point, is to go back and chalk paint over the bleed spots and call it a day. I don’t care if those spots get worn from no poly. More character?
Hi Cathy – sorry to hear you had brown spots appear. That can sometimes happen though – especially if you don’t wait long enough between coats. I would just paint over it and then if you do want to protect it more, wait maybe 24 hours and then go back in with poly.
I am about to chalk an older,kitchen set. I was going to use the wax that so many sites recommend but was concerned that being on chairs, that the wax might come off on clothing. Is this why you went with the clear polyurethane? Does the finished product look different with poly as compared to wax?
Hi Cathy, it depends on what kind of wax you are using. I’m not as familiar with it, but I’m assuming it should dry down just as any other type of top coat would. I also believe they make clear versions of the wax. The main difference in poly and wax, is wax is going to give it more of a sheen, shiny look, while poly is more of a satin/matte finish. Hope it turns out great!
I am getting ready to attempt my first chalk paint makeover. I am going to do my dining room table as well. I loved this tutorial.
Thanks, Tammy! Glad you found it helpful and let me know if you have any questions along the way. Hope your chalk paint makeover turns out amazing!
I have this exact table. The original finish shows so many temperature marks—turns white under heat or cold. How does the new stain and finish hold up to temperature?
Yes! That was one of the main reasons I ended up refinishing it, because there were noticeable temperature marks on it. After refinishing, I haven’t had the first issue with that and although I usually always put pot holders down (just in case), I’ve set some hot things on it before and it didn’t do anything to the table. It’s held up wonderfully!
I love reading your ideas. But my question is I want to paint my round table black & my chairs also. But leave the top stained and chair seats stained. Do they make this Chalk paint in black? Will wait to hear from you. Thanks
Thanks Amalie! The Rustoelum brand (which is what I used) doesn’t currently come in a black color, only a dark Charcoal gray which you can see here. However, The Shabby Chic brand has a beautiful black licorice color here, and it has great reviews! Hope your project goes great!
This table is so cute! I love it so much. I have been looking for something like this to freshen up our kitchen! We are doing some kitchen cabinet refinishing next week and after that I would love to try and make these. Thanks for sharing!
Thanks! Hope your kitchen cabinet project goes great!
I’m currently painting my dining room chairs with the Linen White. I put 3 coats on the chairs and let the last coat dry for 24+ hours. When I applied the poly, it started taking the paint off. Any idea why this is happening? I’ve worked so hard on these and I’m disappointed that I can’t make them beautiful!!
Hi Amy, so sorry to hear that you’ve ran into some issues. Typically this happens if you try to apply it too soon and the paint has any sort of dampness to it (which can happen because of weather/moisture in the air etc.) Also make sure you’re not being too heavy handed when applying the poly and apply with light, gentle strokes. Since this happened, you may want to re-apply another coat of white on everything, wait a couple of days, and then apply the poly. Good luck!
I am wondering why you chose to stain and not just do the paint. Would you please let me know? Thanks!
Tracy
That was just the look I was going for. I personally love having a wood top with painted legs, but you can certainly paint both if you prefer.
Did you have to sand the chairs? I’m thinking of the farmhouse look but I really just would like to paint and not sand. What are your thoughts?
I only sanded the parts I wanted to re-stain with another wood. If you’re just wanting to chalk paint, you don’t have to sand.
Your post is great but I’m confused. You say it doesn’t need to be sanded with chalk paint but then you sanded your table top three times. Which one is it? Sand or don’t sand?
Hi Diana, I’m sorry you’re confused. As indicated several times throughout the post you DO NOT need to sand to chalk paint. You only need to sand if you are re-finishing a tabletop like I did, and the sanding is to remove all the old stain before re-staining. If you are only chalk painting your furniture, no sanding is required before painting. Hope that helps clear things up!
I want to try this sooo bad but am beyond nervous to do it
Hi Susie, I was a little nervous the first time I did it too, but chalk paint is actually pretty easy to work with. Just take your time and use my tips/recommendations for reference, and you’ll do great!
Hi I want to try this with my old dinning table but have it outside. Is this paint and method good for outdoors.
Yes, you should be able to use it, but make sure that you also use several layers of a top coat to protect it from the weather.
Did you have a problem putting a water based polyethylene over an oil based stain?
Hi Paulina, No I didn’t have any issues. My table is still going strong after several years!
I am interested in doing the same. I have a similar table. Table top is veneer. If I sand it and stain it do you think I can get a lighter wood color? Right now mine is a very dark brown color.
Yes, absolutely. You will have to sand it down to the original wood grain and then you can stain it whatever color you like. Mine was pretty dark before I sanded as well.
I love your tutorial! Thank you so much for helping me with my first chalk paint project. I just finished my dining room table and am about to apply the sealant. What would you recommend to use to apply the sealant? Thank you.
Hi Leah, I apologize for the late response – we just moved move to a new state, so I’m just now getting caught up. I’m so glad the post was helpful to you. I shared my recommendation in the post for a sealant. I recommend either Minwax Polycrylic Protective Coat or Ultra Matte Clear Chalk Paint Protective Coat. Hope that helps and I hope it turned out great!
I love it. I will be doing mine. Thank you for sharing. Have a beautiful and blessed week.????
Thanks so much, Sue! Hope you have a wonderful week as well!
For the finish you said you used Matte but does that wipe up messes as well as a semi gloss or gloss would? Just wondering what’s the best finish to use thanks
Hi Audrey! I personally used the satin finish one that I recommended and I prefer it since I have two messy boys. I can easily wipe off the chairs no problem. Hope that helps!
Looks lovely.
We recently moved from a traditional 2-story colonial up north to a lake front home down south. Though my formal dining room set looks nice, I think, I too, want to keep the top the dark cherry finish and paint the legs of table and chairs white and recover the seats in dark navy.
The glass hutch i was gonna keep the inside dark and paint the outside white. Then on both the table and hutch i was going to use a dark finishing wax in the grooves and quickly wipe off. Since your the expert in this, Need an opinion. What you think?
Hi Ranota! That sounds like it will be very pretty! Love that you’re going to add a dark navy color for the seats – that will be perfect for a lake front home. Hope my guide is helpful to you as you complete your project – let me know if you have any specific questions along the way. 🙂
Do you have to sand? I thought with chalk paint you didn’t have to sand
Hi Susie, you do NOT have to sand before applying chalk paint. I sanded the top of my table and chair tops down because I chose to stain those with wood stain; however, I did not sand the legs as I painted those with chalk paint. Hope that helps clarify!
I’m just getting ready to chalk paint for the first time. and I found your website very helpful. my question is, I want to use the distressed good look. Can I paint it a different color underneath and then use a white on top and sand lightly to see the color through?
Yes, you should be able to do that. I painted a desk with chalk paint and distressed it with no problem. Hope it turns out awesome!
How do you distress the furniture?
I like to distress using a block hand sander. This allows a little bit of the original wood stain (or paint) underneath to show through. This is the one I use/recommend: https://amzn.to/2YIVwlX You can also use chalk paint distressing wax like this: https://amzn.to/3uxr9A7.
Love your set! Awesome job. I am about to tackle my dining set soon and want this modern farmhouse look. I have never done anything like this so naturally I’m nervous. I would love your opinion on something… I understand you used stain/poly for the table top and seat area, which obviously requires sanding… If I chose to paint those areas with chalk paint instead (no sanding required) what technique and products would you recommend? And what do you think about liquid wood/chalk paint?
Thanks So Much!
Hi Val! Thanks for your sweet comment! I’m not familiar with liquid wood so unfortunately I can’t offer any advice there, but I will say the reason I chose to stain my tabletop is because a. I liked the contrast of having a wood top with painted legs vs. all painted, but also anything you paint you’re naturally going to have be more careful with wear and tear. If you decide to go that route, I’d recommend definitely sealing your tabletop really well so that it won’t get scratched up easily. Best of luck with your project and let me know if you have any other questions I can help answer!
I’m soooo nervous to do my kitchen set. I need your advice. I’d like to send you a picture of my table. Susie
Sure, you can send me an e-mail to [email protected] and I’ll be happy to take a look.
Hi
Beautiful!
How long for the chairs & table take to ‘cure’ 100%?
Hi Cathy! Everything dries pretty quickly but I believe I waited a couple of days before I started using them again. I’d recommend waiting a minimum of 24 hours just to be safe!
I just wanted to say thank you so much for posting this! I refinished our dining set following your directions and they were so helpful. I’m so happy with the results!
You’re so welcome! So glad it was helpful and I bet your table looks beautiful!
Hey,
Your table looks great! I have done several chalk paint projects and used the polycrylic finish. But when I use it I can never get it to look like yours. You can see the brush marks and I use a brush recommend for the finish. Any suggestions on how to apply?
Thank You
Reta
Hi Reta! Thank you! I included all the products I personally used in the post so definitely check those out! You can actually use one of the small foam rollers if you don’t want to have brush marks showing. I’ve found they work quite well. Also, if you do use a brush make sure you do long strokes, up and down, and try to not go over the same spot twice until it’s dried to get a smoother finish. Hope that helps!
This is amazing! I just bought my first condo & want to revamp my boring black ikea dining table & will definitely be doing this! Such a helpful post with step-by-step instructions & the list of items. Thanks for this post!
I’m going to do weathered gray on the top, but the rest will be the same! Wish me luck!
So glad you found the post helpful, Lisa! Hope your table turns out beautiful! 🙂
Hey there the table looks beautiful and exactly what I’m looking to do to my table I bought from Facebook. I recently purchased the grey weathered stain to practice with on some end tables and the stain was kinda hard to work with. It also has the polyurethane in with it so I was wondering what you used to apply your stain and how exactly you got it on there. My tables I tried different brushes and worked in small sections but it didn’t seem to spread, went on patchy and if I went over a spot twice the brush would just pull the stain off. You can also see lots of brush strokes which I don’t like and yours doesn’t look like you can see any brush strokes. Thanks so much for your help! ?
Hi Christina! Thanks for commenting and I’m happy to help answer your question. The key with any kind of wood stain is to apply tiny amounts at a time. I always dip my brush in, let all the excess drip down in the can and then apply in a thin layer, working a section at a time. You can always apply additional coats later to get the amount of coverage you want, but it’s better to do it in layers and let it dry in between coats, than to try to apply too much at once. (That’s usually when mishaps occur like patchiness, splotches, etc.) I’ve linked everything I personally used within the post under “recommended chalk paint table supplies”. Also, with your comment on the stain not sticking – did you sand down the tables first? The stain has to have wood grain to stick to, so if you’re trying to apply it on top of a previous stain, that’s most likely why it’s not working. Let me know if you have any other questions and I hope that helps!
Hi! I believe I believe that I bought these exact table and chairs! I love the look that you went with so I`m going to try this out. When you sanded the top of the table and chairs, did your sander leave grooves in the wood at all?
Thanks Ellie! No it didn’t leave any grooves in the wood it just smoothed out the surface and removed all the original varnish/stain that the company had put on it. Hope your project turns out amazing!
So I searched all over pinterest and loved your piece the best. I started today step by step and I ran into a road block. Very frustrating. The stain is super sticky after 4 hours of staining. I got the same exact stain that you mentioned. I tried sanding it and it’s super sticky. What do I do!?!?? Help!!!!!
Hi Ashley! So sorry to hear you ran into a snag. It sounds like you might have applied too thick of a coat of stain, which is why it’s not drying down and remaining sticky. Also did you sand your tabletop before applying stain? That’s a very important step, otherwise the stain won’t have anything to adhere to/ won’t dry down. Here’s an article I found that might be helpful to you in fixing your issue https://homeguides.sfgate.com/fix-sticky-wood-stain-87285.html#:~:text=Stain%20becomes%20sticky%20on%20a,another%20heavy%20coat%20of%20stain. I hope you’re able to get everything fixed soon!
Ya, so I went through and wiped down the table with mineral spirits and it came out beautifully. I did sand it before, but I think you’re right about putting it on too thick. Now I’m running into an issue with the white chalk paint having some yellow showing through after 2 to 3 coats. It’s only spots of yellow. I will say it’s starting to look gorgeous!
I’m so glad to hear that it’s turning out great now! Feel free to share a photo/tag me on social media once your project is complete. 🙂
I am a bit confused, I thought the great thing about chalk paint was no prep or sanding, but you sanded,,,do you need to?
Hi Heidi, as I mentioned throughout my post the only part I sanded was the top of the table and chairs which I wanted to refinish/stain. The table legs and chair legs were chalk painted without any sanding. I listed out all the instructions and all the supplies I used in the post. Hope that helps clarify.
Hi! Your dining room set came out beautifully! I just recently did almost the exact same thing to my daughters set for their new home. Rustoleum Chalked Paint is by far my favorite paint ever and Linen White is what is use most. I did the bottom in White like yours but distressed it some and used the Varathane gel stain in black for the top and it looks amazing! The gel stain is a game changer when it comes to staining! It was so easy to apply, I couldn’t believe the results! I used 3 coats of the chalked paint on the bottom, then 2 coats of the gel stain on top and put 3 coats of polycrylic on the whole thing. Since her chairs had fabric seats she just recovered them with black covers. It’s so amazing how paint can make something look so completely different and brand new!! Rustoleum rocks!!!
Hi Candy! Thanks so much for sharing your experience with using the Rustoleum Chalk Paint and your daughter’s set sounds beautiful! Good to know about the gel stain too- I may have to try that on future projects. Thanks again for commenting!
I’d love to see a pic of your finished project. It sounds like a look that I’m trying to achieve on a piece as well.
Did you sand down any of the chalk paint to give it a antique look? If so does that happen before the top coat? And how do you do it, with what?
Thank you!!
I personally didn’t sand down the chalk paint as I wanted a more crisp, clean look rather than an antique look. You definitely could though and you would sand it before adding the top coat. I’ve linked all the products I used in the post, including the sander I recommend. Hope that helps! 🙂
Thank you! I bought everything you suggested just got to the end part and wasn’t sure if you sanded it. Thank you for this tutorial!!
You’re so welcome!
Hi, I used a rustoleum matte clear protecting layer on the table legs after I painted them with chalk paint in linen white. when it dried it started to leave yellow stains. Do you think I should go with ‘Minwax 63333444 Polycrylic Protective Finish Water Based,1 quart, Satin’ instead? also can I use this same protective layer on table top which I used wood stain Kona?
Pls suggest. I really liked your project and trying to do the same with my dining table,
Hi Priyanka! Yes, I would try using a different protective coating since it sounds like it had some sort of reaction. You might want to repaint and then apply the protective coating to get rid of the yellow stains. And yes, you should be able to use the same product on both. Hope it turns out great!
Thanks for your response
This project came out gorgeous!! Wow!! I LOVE that Kona stain and the paint color is so bright! Great job!! You gave me an inspiration for my project!
Thank-you so much! Good luck on your project! 🙂
Hello, I love how your dining table and chairs came out. I am planning on painting my dining table exactly like yours, but I was wondering if you also applied the polycrylic over the table top or just over the chalk paint?
I just did it over the chalk paint because the stain I purchased (and the one that’s linked in the post) has stain + poly in one. Best of luck with your project, I hope it turns out amazing! 🙂
Hi!
I’m about to embark on this dining table chalk paint journey as well! I’ve chalk painted other furniture piece before, but I’ve always distressed them with a sand block afterwards. I was never worried about that “clean” or “perfect” look, but since I’m thinking I won’t be distressing the dining set, what do you recommend so that it looks more “clean” or maybe “even” is what I mean?!!! (I hope that makes sense! 😉
Thanks! Oh… and you’re project looks great! Exactly what I’m going to do! 🙂
Thanks Stephanie! I did several coats to give it that full-coverage, “clean” look, and I definitely recommend using the clear sealer over it so that it will last. I also like using a foam roller vs a brush, since it seems to give it better coverage. Hope your project turns out amazing! 🙂
Now that we are in quarantine I finally have time to do this project! I’ve anted to change my wooden kitchen tables and make it look updated. My question is do you think the darker wood on top of the table with the chalk white legs go with a lighter wood floor? My kitchen goes into the living room which has an oak floor color.
Also how long was the whole project?
Love the look!!
Thanks Kristen! I think it’d look great with lighter wood floors, as it would have a nice contrast. And if you can do it minus distractions and stopping/starting you can probably get it done in a weekend or 2-3 days. Hope it turns out amazing for you! 🙂
Wow this is amazing. I’m going to try this in my old dining set. I was just wondering if you sand each coat of polycyclic when you applied it on chalk paint? Thank you!
Thank-you! I did not, I only sanded the wood part in between the coats because it held onto the grain and needed a little smoothing. The chalk paint area was super smooth so there wasn’t a need to sand it. Hope your project turns out amazing!
I am about to do this with my kitchen table. Have you ever worked with the Rust-Oleum Chalked paint in the spray can? I was going to use that but would I still have to put a protective coat over that?
I actually bought a can earlier this month but still haven’t used it yet. I would probably use that for a smaller sized project, but if you end up trying it let me know- I’d love to hear how it turns out. Regardless of which you choose I definitive would still recommend putting a protective coat on it to help it hold up against spills, heat, and just everyday wear and tear. Good luck with your project! 🙂
Cara, I have the exact dining table full of scratches. I want to make over this bad a** but I am really afraid of sanding specially with not having the tools and all those details on the chair. Can I not sand at all and apply chalk pain and done??
Hey Mahsan! Yes, if you don’t want to re-stain the wood top, then you can just skip sanding and paint it all with chalk paint. Make sure you do several coats to ensure full coverage and I also recommend doing 2-3 coats of the clear protector to help it last a long time. Best of luck!
Thanks a lot for your prompt response. I do not even know why should I stain my table so I go with chalk paint directly. It is going to be my very first project. I really appreciate you and your inspiring work.
I’m going to do this to my table and chairs, I was wondering if the Minwax Polycrylic topcoat was still holding up to wear and tear on your table and chairs? I have 3 young kids and need something super protective because they do homework and art projects at this table. I hate to do all this work and have it chip off 🙁
Hey Dawn! Everything has held up really nicely so far – even with my two rambunctious boys. Although it’s a bit time-consuming, I would definitely recommend applying several coats of the chalk paint/protective topcoat on the chairs so everything will last. Let me know if you have any other questions and hope it turns out amazing if you try it!
was the top of table wood or veneer?
Hi Jill! It’s wood.
I love this look. Did you have to sand the table legs before applying the chalk paint?
Thank-you! No, I only sanded the table top and tops of the chairs because I stained those. Chalk paint makes painting so much easier because you don’t have to sand or prime. Let me know if you have any other questions!
I love how it turned out! Refreshing pieces you already have is my favorite.
Thanks! Agreed. I know a lot of people would rather buy, but I like upcycling when I can – especially since it’s been part of our family for a long time.
That is not at all what I was expecting. I just envisions dusty old chalk boards from school.
This is gorgeous!!!! Thanks for the idea
Haha you just made me laugh out loud! I thought the same thing a couple years back when I heard about it. And thank-you! It’s really easy to work with and has great coverage vs having to do 87 coats with traditional paint.
It looks like a brand new dining set! You did an amazing job, lady. I used to love working with chalk paint because it is so easy to use. Hopefully your family is enjoying the “new” table and look!
Just sayin’,
Karly
https://www.whatkarlysaid.com
Thank-you! Chalk paint is SO much easier than traditional paint, and it’s held up wonderfully! I’m definitely in love with how it brightened up the space.
I have an all brown table like Yours but my seats are leather. Would you think I could just paint the top white with chalk paint and leave the legs and chairs brown? I’m looking for the farmhouse style as well so wanted to “distress” the top with white! Suggestions?
Hi Erika, I think that’d be really cute! You could always chalk paint/distress the legs or the back of the chairs to really tie it in with the table, or leave it brown and I’m sure it’d look great too. 🙂
Cara! I am obsessed with this. It looks SO good. It totally brightens up the area and transforms it to be eye opening. You did such an amazing job. This sounds like something not too complicated at all and love how it turned out. Amazing work!
Thank-you so much! I agree it definitely brighten up the space and looks SO much better. It definitely isn’t hard at all and that’s why I went with chalk paint. I didn’t want to have to do 10 coats of paint and primer and the chalk paint has held up wonderfully!
Hello, I am looking to redo my dining table and would like to go this route! When you sanded in between staining with the fine finisher grit… was this with your handheld sander or with sandpaper? Also, if I’m doing my dining table, 4 chairs and 2 benches (only staining the top of my dining table) how much of each product would you recommend I buy? I see you mentioned in the comments that you actually like using the roller for the chalk paint. Is that true? What tool do you recommend for applying the stain? And did you wipe the stain off immediately after applying?
Hey Susan! So excited to hear you’re going to be doing this project! To answer your questions, I used this hand held sander sponge in between coats: https://amzn.to/3d6ANNZ I would recommend probably 1 can of stain, 2 cans of chalk paint, and 1 can of protective coat. (Everything is linked in my post under recommonded supplies) And yes, I do prefer using a foam roller for the chalk paint, because it gives a more thick, even coverage. Here’s a similar foam roller set to what I used which also includes a paint try, brush, and tarp. https://amzn.to/3hwieWX For the stain, I used a brush and really took my time going over each section to ensure there weren’t any drips. I didn’t wipe away the stain because I wanted a full stain look, but if you want a more sheer look you could wipe it immediately using a lint-free cloth. Paint Brush: https://amzn.to/2kQHpet Hope this answers your questions and let me know if you need anything else! Best of luck!
I applied 2 in 1 stain and when I was done there was shiny and dull spots. What did I do wrong?
Hi Rosalie, I’m sorry to hear that happened. It could be several things. The temperature of your home and the stain or the surface itself could have caused it. Sorry I can’t be more help, but hope you’re able to fix it!